Install the Anonymised tag using Google Tag Manager
A step-by-step guide to deploying the Anonymised tag using Google Tag Manager.
The Anonymised tag may only be installed on authorised domains. Deploying the tag does not guarantee an active service.
Google Tag Manager may write to localstorage before consent is granted. If deploying the Anonymised marketing tag using the GTM template we recommend you review this guidance on how you may mitigate for this. To be absolutely clear, the Anonymised tag is not responsible for this action and cannot function without consent.
As the Anonymised tag uses a call-back to initialise the persisted browser id, an additional pageview and a referral will be registered by your analytics - we recommend that analytics teams refer to this article.
Instructions
Receive your client ID from your Customer Success Manager or Support.
Open Google Tag Manager and navigate to and open the relevant container.
Select Tags and click on New.
Select Discover more tag types in the Community Template Gallery under Choose tag type.

Choose from the Community Template Gallery
Click on the search icon beside Import Tag Template
Type Anonymised into the search and our tag should appear, click on the tag to select it.
Complete the tag fields as follows:-
Required settingsAnonymised Client Id - the client ID obtained from your Client Success Manager or support. Client IDs are case-sensitive, please type as instructed.
Top Tip
If you are installing the Anonymised Marketing Tag on multiple sites and using the same client ID, we recommend creating a variable for the client ID and then referencing the variable when prompted for the Anonymised Client ID - see below: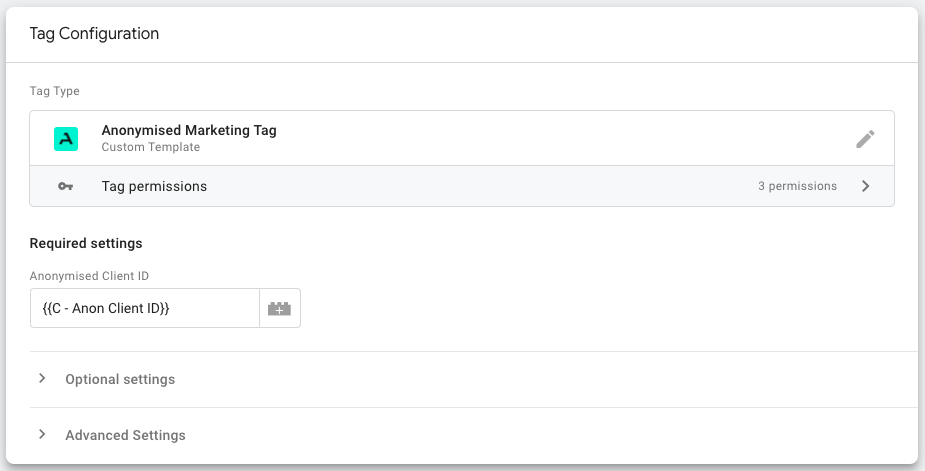
Anonymised marketing tag required settings
The required settings will enable any site running the IAB’s Transparency & Consent Framework (TCF) in their Consent Management Platform, to activate the Anonymised marketing tag.
If you do not have any customisation requirements skip to point 8 - Naming the tag else see below for the optional settings.Optional settings
Consent Management Configuration - only use when:
You are not using the IAB’s TCF for consent management but are using GDPR which uses Cookie Settings (common on brand and e-commerce sites).
You wish to display the Anonymised widget in the bottom left-hand corner of your site.
ConfigurationChoose the Consent Management Platform

Pick a supported CMP from the drop-down list or leave blank
to default to TCF.When choosing the following CMPs additional configuration will be required:
Sourcepoint Dialogue
Requires the configuration of the Privacy Manager ID for your Sourcepoint installation
Enter your Sourcepoint Privacy Manager ID when prompted
Onetrust / CookiePro
Requires the configuration of the Cookie Setting used to demark the Anonymised tag’s consent when using GDPR
Enter a cookie setting when using a CMP supporting GDPR
Read our extended guidance for Using GDPR and not TCF for consent.
Display the Anonymised widget

Tick to enable the appearance of the Anonymised widget on the site pages.
Remove the preference option from the Anonymised widget

Tick to remove the CMP integration from the Anonymsied widget
Set the background colour of the Anonymised widget
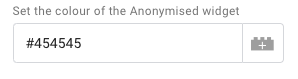
Set the colour using hexadecimal
Additional Configuration - more features:
Enable retargeting

Tick to enable the Anonymised marketing tag to manage retargeting audiences.
We recommend that you speak to your Customer Success Manager or support before setting up your first retargeting segment, for further guidance.
Configure page exclusions

Tick to disable the Anonymised marketing tag from executing on user interaction pages such as contact forms, article comments or shopping baskets.
When enabled you will be prompted to add the pages using the Add a new page button. Click this button to enter the path of a page to exclude. Enter one path per row. For example: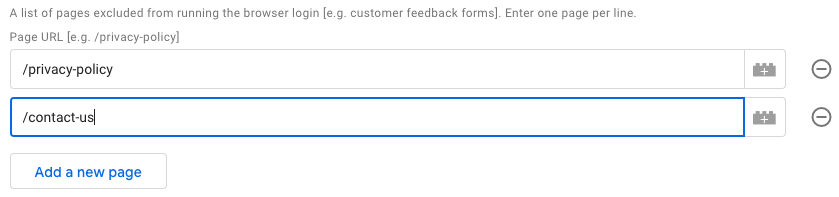
Example of excluded pages
Name the tag using a suitable nomenclature, for example, CT - Anonymised tag.
Under Triggering, choose Initialisation - all pages under Choose trigger type.
If this trigger type is not available, choose Pagevew trigger and set the Tag firing priority under the tags Advanced Settings to a high number, e.g. 9999.
Alternatively, set this tag to fire immediately after your consent management tag using Tag Sequencing.
If you are using Google consent mode and integrating with your Content Management Platform, you may choose to use a different trigger event. Please refer to your CMPs guidance for further assistance.
Click Save.
Publish the GTM container.
Advise your Client Success Manager or support of the domain(s) on which the tag has been deployed.
You can easily check that the Anonymised Marketing tag is deployed via GTM as the source code will include the URL parameter ref=gtm in the tags library call, e.g. https://static.anonymised.io/light/loader.js?ref=gtm
You may also consider proxying your GTM installation for reliability, performance and security reasons, read more here.
It is important to ensure that the tag is installed and executed on all secure pages of the site. The profile of audiences that can be built will differ if the tag is only partially installed or installed on non SSL pages. Please advise your Client Success Manager or Support if you intend to only partially install the tag.
Related articles
- Understanding the Anonymised Data Account
- Safeguarding your Web Analytics
- Preventing search engine bots indexing the callback URLs
- Optional Anonymised tag parameters
- Marketing Tag Installation
- Marketing tag deployment considerations
- Integration with Consent Management Platforms
- Install the Anonymised tag using Prebid
- Install the Anonymised tag using Google Tag Manager
- Install the Anonymised tag using Adobe Launch
- Install the Anonymised tag natively
- Controlling Amazon CloudFront CDN cache keys
- Comparison with Web Analytics
- Anonymised tag alternative deployments